 Home
HomeAll Hacks
Zetec Engine
SPI Engine
General
Suspension
Interior
Exterior
In-Car-Entertainment
Detailing and Cleaning
Maintenance
Miscellaneous
Air Conditioner re-fill and service
It's going to be summer soon, and in many parts of the world, things are going to be heating up. Make sure your A/C is running at its best. If the AC isn't quite as cool as it used to be, the solution might be as simple as recharging the system. You can do it without even getting under the car or popping the hood!
Time Required:
30 minutes to 2 hours
Tools Needed:
Procedure:Note: The A/C system is under high pressure. Also, while R134a isn't as bad for the environment as the older R12, there is still a heavy fine for venting R134a into the atmosphere. You should never take apart your A/C system without proper training and refrigerant recovery equipment. Wear protective glasses at all times while servicing your A/C. Also, you will be working under or near the car while it is running. Please observe all safety precautions and refer to our disclaimer on the front page.
Initial troubleshooting
If you have access to a thermometer, run your A/C on high with recirculate, and leave the thermometer stuck in one of the vents. After driving around for a while, the air coming out should probably be between 40*F and 50*F unless it's very hot outside. If the air coming out is much warmer than this, your A/C is probably not functioning properly.
With the car running and A/C on Max, pop the hood and listen for or watch the A/C compressor pulley. It has a clutch, so the center of the pulley may spin intermittently. It should start and spin for 30 seconds or longer.
If after 90 seconds it never spins, make sure your A/C is turned on. If it spins for just a few seconds, stops, then starts again after a few seconds, it is short cycling. Either of these could be caused by low refrigerant levels. There may be a leak or something more serious at fault. You may try recharging the A/C system with a leak-indicator additive refrigerant. See advanced troubleshooting information at the end of this article for more information.
Pressure test and recharge
1) Get some tools and supplies together.
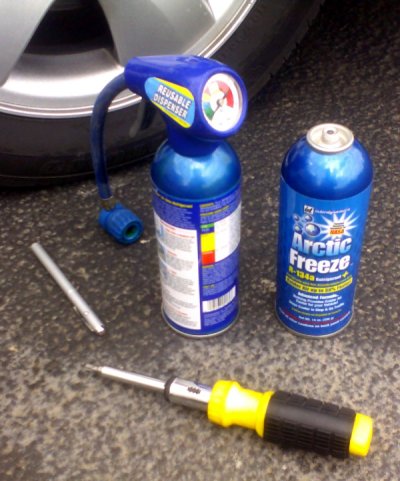
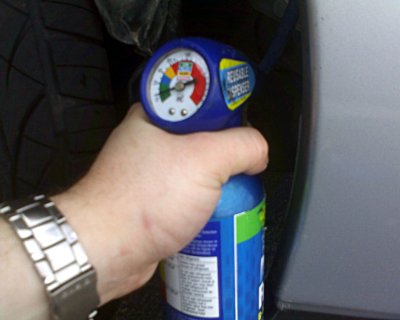
The Arctic Freeze Recharge Kit, made by Interdynamics, contains 2 fairly large containers of R134a Refrigerant, one with UV dye, as well as a trigger-actuated refrigerant dispenser nozzle that has an integrated pressure gauge. To top it off, this kit also came with a UV-emitting LED pen-light, which makes the UV dye extremely visible to the naked eye without any need for special UV glasses. This kit is available at most auto-parts stores, and the dispenser nozzle and gauge are re-useable, and fit most R134a canisters. You'll also need the other tools mentioned above. If the A/C recharge kit requires assembly, follow the instructions that come with the kit.
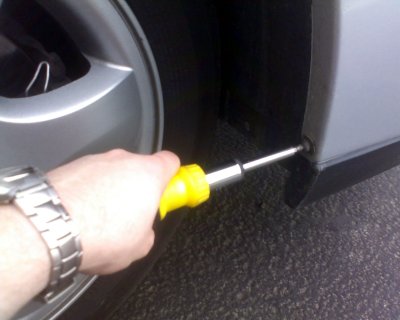
2) With a Torx T30 driver, un-fasten the front part of the wheel well liner on the passenger side of the car.
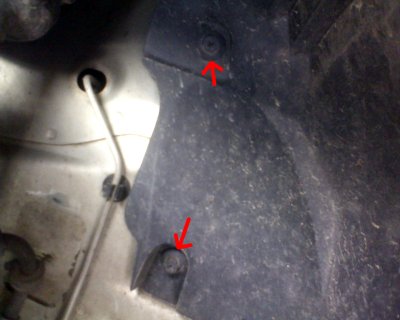
3) With a Philips head screwdriver, un-fasten the 2 body snaps holding the wheel well liner. Then let the wheel well liner fall out of the way and rest on the tire.
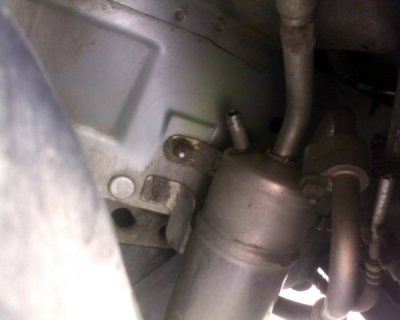
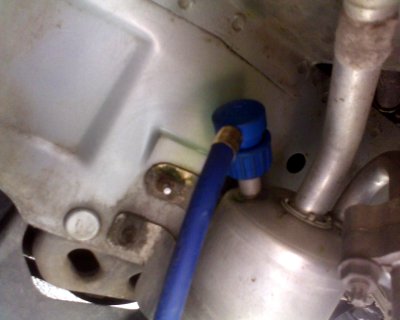
4) Locate the Low-pressure A/C recharge port, which is on top of the reciever dryer (metal canister).
5) Attach the hose to the service port and examine the pressure. I've been told that while the car is off, a rule of thumb is that the pressure should be about the same as the ambient temperature in Fahrenheit. If it's 80 degrees outside, the pressure at this service port should be somewhere around 80 PSI.
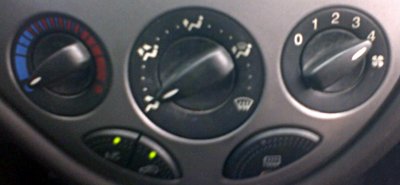
6) Start the car and run the A/C on high with recirculation as shown below. This will make sure that the A/C pump is running as hard as possible. If the A/C compressor isn't running (you can usually hear it), the pressure may read high. If the A/C compressor never starts, or if it's short-cycling, the readings could be off.
7) If the system needs recharging, start adding refrigerant to the system per the instructions that came with the recharge kit. For this Interdynamics kit, you simply read the pressure, then momentarily hold the trigger down to add regrigerant. Release the trigger, and check the pressure again.
8) Once the pressure looks right, replace the plastic body snaps and torx screw that hold the wheel well liner in, and take the car for a drive with the A/C Cranked. If all went well, it should be nice and cool!
Advanced Troubleshooting
Once complete, you may want to check the A/C components for leaks; especially if your A/C seems to gradually become less effective. If you filled up with a UV-Dye refrigerant, you simply use a blacklight such as the pen light that comes with this kit, and shine it on all A/C the components that you can access from under the car and under the hood, looking for the telltale bright yellow glow. The dye is harder to spot in daylight, so you may wait until the evening or pull into a dim garage to examine some of the brighter areas of the A/C System. The service port will naturally have some dye on it after feeding dye into the system, so I've used it as an example to show what the dye looks like under U/V. Dye on the service port is usually benign. If in doubt, clean the U/V dye off and drive around for a while longer, and see if the dye returns. The most common places for leaks are at unions and connectors, and from the A/C compressor itself. Check those areas thoroughly.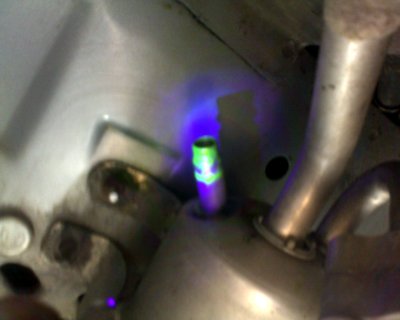
If there are any small leaks, you may try buying a canister of compressor-safe A/C leak sealer. This can usually be added to your system the same way you recharge it, so you shouldn't need to buy another hose if you bought a system like the one I used. If you encounter a large, hissing leak, or if your leak persists after adding stop-leak, you should see a professional mechanic.
There is a high-pressure service port under the hood (covered with a plastic cap, near the radiator). A high pressure gauge hooked up to this port, combined with the low pressure guage in the recharge kit, can point out a failure with the expansion valve or the compressor. These high-pressure gauges use a different size of connector, and are not usually sold with the "do-it-yourself" style A/C recharge kits. If you get one though, you should be able to watch the high pressure rise and the low pressure fall when the compressor kicks on. When the compressor is not running, the two gauges should start to equalize after a little while.
There are components of the A/C System (both electrical and mechanical) that don't leak when they stop working. There is also quite a bit of A/C plumbing and several components inside the car that can't be easily tested with dye. U/V dye can't troubleshoot all the problems! Here is a very small symptom chart with possible problems listed. Most of these problems require professional service, however.
Compressor never turns on:
* A/C Not running
-- Make sure fan is on HIGH, temperature selector is turned all the way to COLD, and that the A/C and recirculate light indicators are on (recirc doesn't work in defog mode)
* Electrical connector to compressor clutch is disconnected, or the circuit is bad (short/open/blown fuse)
-- Check connectors, fuses, and wiring for the compressor
* Refrigerant Pressure is too low
-- Check refrigerant pressure, add if needed
* A/C Pressure sensor, or the wiring to it is damaged or disconnected.
-- Visually inspect wiring going to the sensor (on my Focus, it's near the reciever/dryer, a "T" coming off the A/C hard line)
-- Check pressure sensor with a continuity tester or ohm meter, if circuit is open but system pressure is okay, the pressure switch may be faulty.
-- If switch tests okay, make sure its connector is plugged in firmly to the wiring harness.
-- May require a mechanic
* A/C Compressor clutch mechanism has failed
-- See a professional mechanic
Compressor short-cycles (on and off very quickly):
* Refrigerant Pressure is too low
-- Check refrigerant pressure, add if needed
* A/C Pressure sensor, or the wiring to it is damaged
-- Visually inspect wiring going to the sensor (it's near the reciever/dryer, a "T" coming off the A/C hard line)
* Expansion valve damaged
-- See a professional mechanic
* Compressor damaged
-- See a professional mechanic
Compressor is running but pressure stays very high
* Refrigerant pressure too high (overfilled)
-- See a professional mechanic. DO NOT VENT THE A/C LINES!
* Expansion valve damaged
-- See a professional mechanic
* Compressor damaged
-- See a professional mechanic
Compressor is running, pressure is good, but the system is not blowing cool air
* Temperature control malfunction
-- Check the HVAC temperature knob, the cables going to it, and the other end of the cable down in the center console in the driver's side foot well.
--These components should move when you change the temperature selector. If not, a cable may have become disconnected or may have broken. Re-attach or replace as needed
* Frozen or blocked evaporator
-- See a professional mechanic
Blower fan does not run or only runs on certain settings
* Blown fuse
-- Check the HVAC Fan fuse (see owner's manual)
* Damaged HVAC fan switch (common failure)
-- Test the switch with a multimeter, replace if needed
* Burned up HVAC fan resistor
-- Test the resistor going to the HVAC fan, replace if needed
As you can see, it's worth noting that mobile A/C service can be a very complex task, and quite often requires the use of expensive diagnostic equipment. HVAC technicians are usually licensed to handle refrigerants properly. They're also trained to troubleshoot and repair a whole variety of problems with air conditioner systems and they have all the right tools for the job. A lot of times a pair of cheap gauges, a blacklight and a kitchen thermometer simply don't cut it. Leaks inside the cabin usually require an expensive refrigerant detector (often called a "sniffer"). This is only one of many specialty tools that the pros use. Air conditioner systems are also very expensive, so if you're in doubt or worried about damaging something, take it to a pro.
comments powered by Disqus